Complete Guide to TrueNAS CORE Virtualisation Under Proxmox


TrueNAS CORE (formerly known as FreeNAS) is one of the best NAS software available as of this writing. This article will not discuss the pros and cons of a NAS solution and assumes you have already decided on a non-enterprise NAS solution for your current needs.
As a matter of fact this is probably the reason why you found your way here - to run TrueNAS CORE in a Proxmox Virtual Environment (VE).
Note iXSystems is developing a similar product - TrueNAS SCALE. Ultimately i believe CORE + Proxmox fits my needs better at this time.
Read on to find out why.
Proxmox VE + TrueNAS CORE vs TrueNAS SCALE
TrueNAS SCALE is a hypervisor and NAS built into one. Whereas Proxmox VE is a dedicated hypervisor and CORE is a dedicated NAS. As such both solutions are pretty similar.
In the end I decided to proceed with Proxmox VE and TrueNAS CORE because:
- Both TrueNAS Core and Proxmox are very mature products while SCALE is still new (currently in Release Candidate at time of writing)
- Proxmox uses LXC while SCALE uses Docker. IMHO LXC is a better solution (admittedly with less readily available software)
- I only need a single node for my storage nodes. Go with SCALE if you need to scale out your storage
- I am familiar with how Proxmox backup works while I can't find any info on SCALE without experimenting
- Proxmox built in firewall allowing me precisely control who can access my file sharing services. Unsure if SCALE has a similar feature
- Proxmox has a dated UI, but it is very functional.
At the end of the day, deploying SCALE appears to be one way. I.e. I may need to re-create my zpools if I ever want to return to CORE. Sticking with Proxmox + CORE is more sensible/practical as there is a migration path from CORE to SCALE if I choose to do so.
Here is a step by step breakdown:
- Step 0 - My Hardware
- Step 1 - Install Proxmox
- Step 2 - Setup Proxmox Networking
- Step 3 - Install TrueNAS
- Step 4 - Install qemu guest agent
- Step 5 - Setup TrueNAS Networking
- Step 6 - Setup Storage Pool
- Step 7 - Setup L2ARC (ZCache) and ZIL (Log)
- Step 8 - Setup Proxmox Firewall
- Step 9 - Extras
This guide is more intermediate and may include some advanced topics. Some of the topics are not deeply dealt with as such newer users to Proxmox and TrueNAS may struggle at certain points. Feel free to post a question below or in the forums if you need help.
My Hardware
Made a decision to go with consumer hardware for this build. Do treat these components as a guide as my choices for this build may not reflect your requirements.
As always, go with enterprise/server grade hardware if your budget allows.
RAM
Literally spent months researching this issue.
ECC RAM is the go to choice for TrueNAS builds. However I decided to go with non-ECC memory. There reason this will be revealed in conclusion. I have two other NASes with ECC memory that are now backup NASes so I should be protected on that front.
In other word this new NAS build I'm doing is an experiment as to whether ECC RAM is really important, or not.
Always test the RAM to make sure they are working as expected. I'm doing this with memtest. You do not want a stuck bit in your memory ruining all your data And yes, it can happen.
The minimum memory requirement for TrueNAS is 8 GB, so you need at least 16 GB for your server because of the Proxmox overhead.
ZFS needs heaps of RAM, so I'm going with 2x32GB DDR4 3200MHz with the option of moving to 4x32GB in the future. Ideally go with RAM from the Qualified Vendor List of your motherboard. Unfortunately I couldn't find any compatible RAM module so I picked a random one.
CPU: Ryzen
As the picture above suggested, I'm running a Ryzen 5600G. This CPU has a built in GPU, and to me feels faster than a Xeon.
Choosing this CPU means I do not need to install a dedicated GPU card and waste a PCI-e slot.
Motherboard
You will need a motherboard with IOMMU and ACS support in the UEFI/BIOS. I am using Asrock B550M Phantom 4. This motherboard has IOMMU but no ACS support.
Missing the latter feature means I lost the flexibility. Example I can pass through the first PCI 16x slot, but not the second PCI 8x slot because the latter group has two many critical devices tied to to it.
IOMMU is only needed if you want to pass through your HBA controller into the virtualised Proxmox. Whilst optional, these two features are really good to have as it means you will not be limited by hardware restrictions.
Deciding on a suitable AMD motherboard is a minefield. Ideally you'll want to use a motherboard that works with a 5000 series CPU without a firmware upgrade. Second you need to find a motherboard/CPU combination that works with ECC if you choose to move to that in the future.
After months of research I gave up and just went with random parts. Comment below if you find a good CPU/motherboard that supports ECC.
Host Storage
I'm going with NVMe and SSD. NVMe to host the Proxmox Operating System and some virtual drives. While the SSD provides a additional storage for VMs and containers.
HBA Controller
This is optional because you can pass through the hard disks from your Promox VE host into TrueNAS CORE virtual machine (VM). Having a controller means I can simply pass this card into the VM, and forget about creating virtual raw disks for the VM.
It is also good to have if I decided to move away from Proxmox. Because TrueNAS is directly accessing the disks from the controller, it means I have less of an issues if I want to move to other OSes.
Choose this card according to the number of storage drives you want, and the IOMMU group. As an example, choose a 16i (16 internal) if you can only assign 1 passthrough card and you want up to 16 bays. For my case I chose a LSI 8i card as I can only pass through one PCI-e card and my case can only accommodate 8 bays.
If you are getting a controller online make sure you get one that looks like this: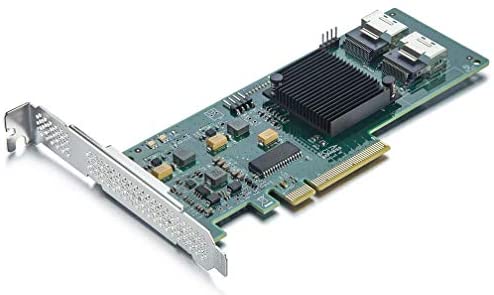
Key identification markers are:
- Perforated PCI bracket
- Black heat sink
- IT firmware (P.20 and above). You need to flash the BIOS to IT mode (instead of RAID).
Network Controller
This is optional. Most consumer motherboards only have 1 Ethernet port (like mine) so a second network card may be necessary. You can also share all your traffic on the onboard NIC.
TrueNAS is known to be picky with NIC. Most onboard motherboard uses the Realtek NIC which can be problematic in TrueNAS. Proxmox being Debian based is more forgiving. And it is possible to pass the Realtek NIC into your TrueNAS VM as a Virtual Network device, thereby abstracting a lot of issues away from TrueNAS. That being said, Realtek do have performance issues and it's best to look for a motherboard with an Intel chipset NIC for the speed and compatibility reason.
With this optional Network card, ideally you'll want to pass this through directly into your VM as well. However, I am constrained by my IOMMU group limitations and will only be passing this through a OpenVSwitch bridge.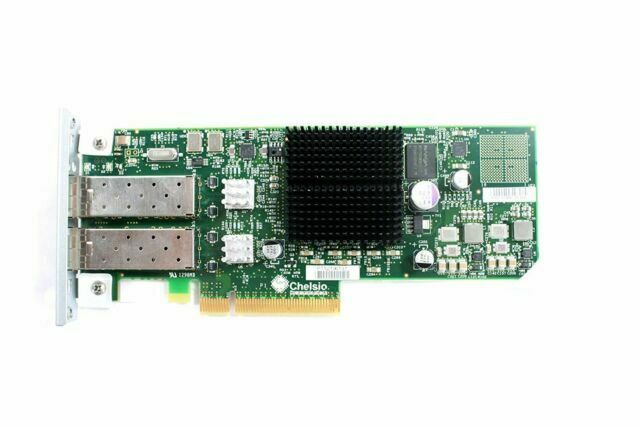
I'm going with a Chelsio 2x 10GBps SFP+ network card.
HDD cage
Again this is good to have, but not entirely necessary. If going with a HDD card first check your onboard SATA or HBA controller is supporting hot plug (i.e. you can remove/add HDDs while the computer is still running). There is no point going with HDD cages if your host controller do not support hot-plug.
I am using a SilverStone RM21-308 case with 8 bays.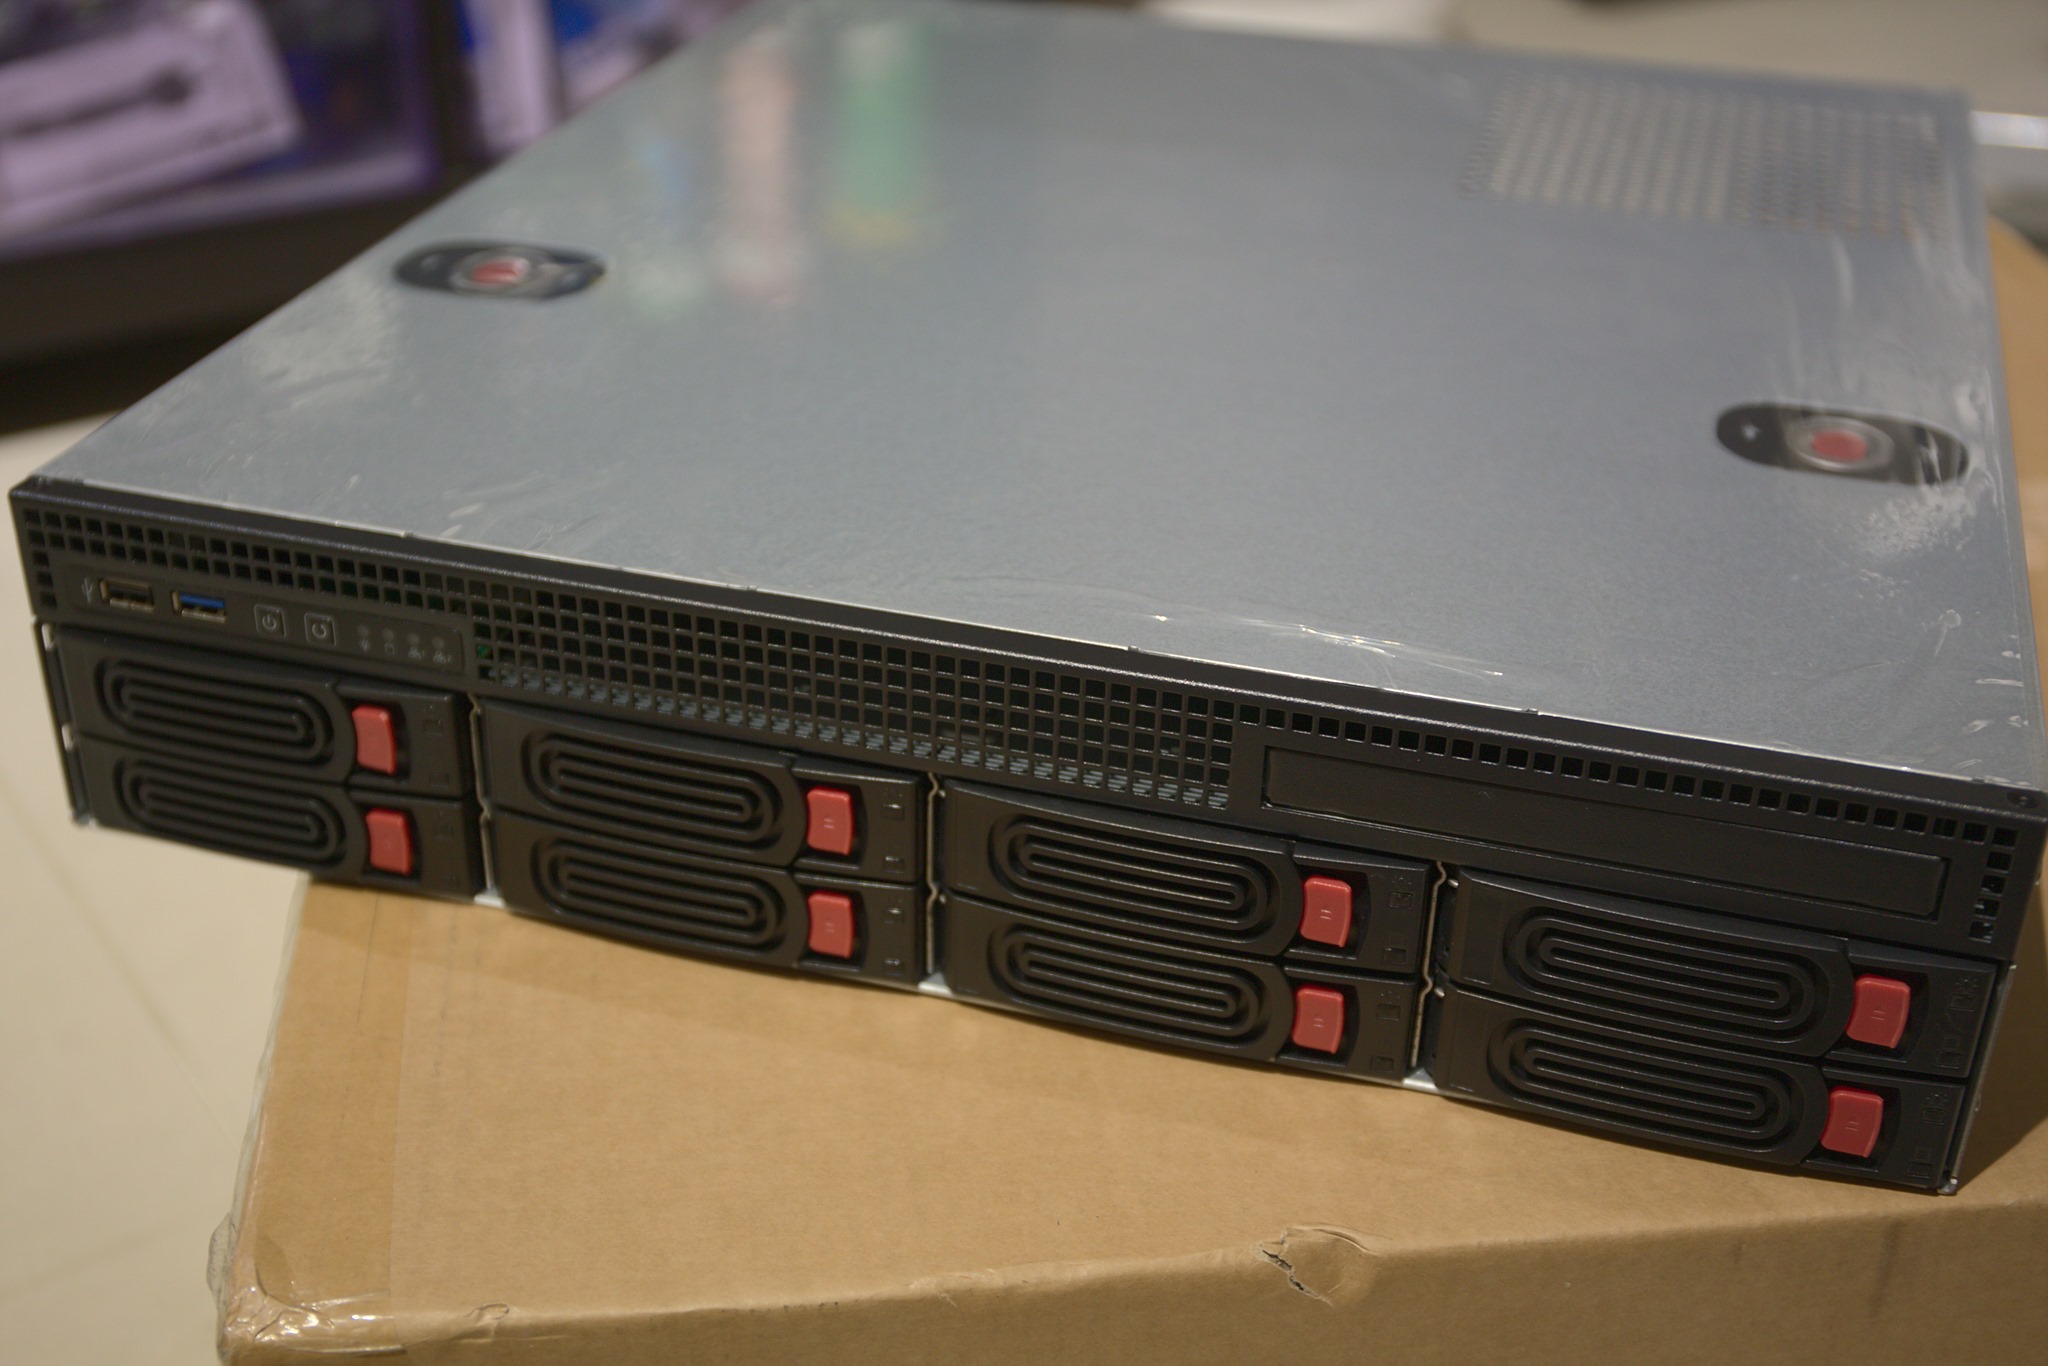
Last but not least. If you are going ahead with the Ryzen 5000 series setup, heed this advice - buy your 5000 series CPU and motherboard from the same source and have them upgrade the motherboard BIOS before you pick them up. Older motherboards require you to use an older Ryzen CPU in order to flash to a newer BIOS. You'll be stuck in a huge pickle if you don't have any spare old Ryzen CPU you can randomly use for this BIOS upgrade. Make this your retailer's problem, not yours. You can thank me later. 😃
Complete Guide: Step 1 - Install Proxmox
First thing you need is to install Proxmox VE. Follow this guide to install Proxmox.
Later versions of the Proxmox 7 installer defaults to ZFS as the filesystem. Change this to EXT4 or XFS and LVM/LVM-thin. Obviously you can still go with ZFS, but with TrueNAS running ZFS I just do not see a good business case. No ZFS on the host OS just seems less complicated, this also leaves more RAM for your VMs and containers.
Once Proxmox is installed, go to the admin console from another computer and you should see the following prompt:
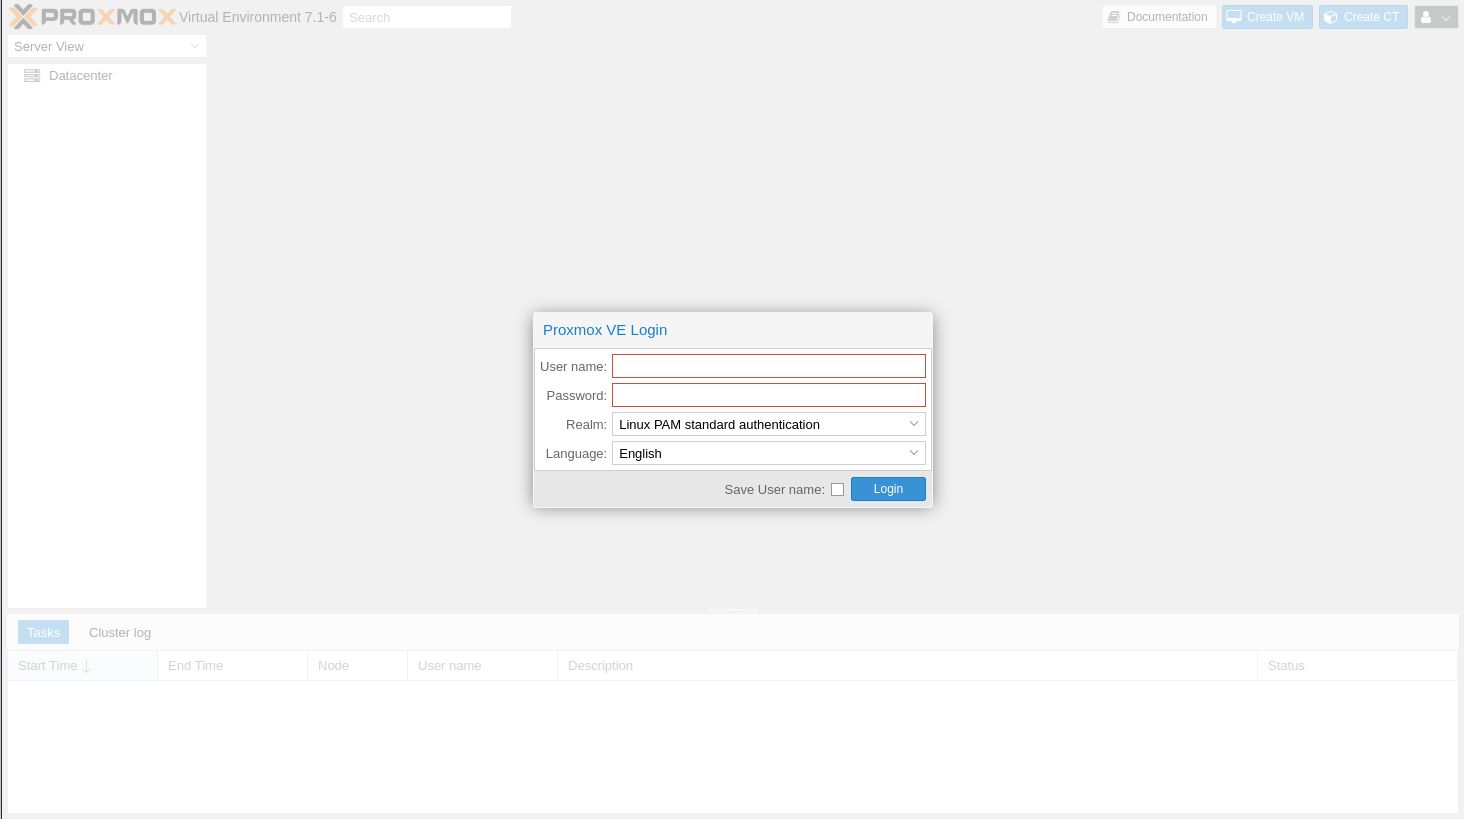
Login as root, plus the password you've entered during installation. Select your server node to expand it's settings, click the ">_ Shell" menu item to go into the Proxmox shell.
You'll need to make the following modifications.
Since I do not have a Proxmox subscription, I modified /etc/apt/sources.list.d/pve-enterprise.list and comment out the subscription server, like so:
# deb https://enterprise.proxmox.com/debian/pve bullseye pve-enterprise
I also modified /etc/apt/sources.list to include pve updates (pve-no-subscription). This allows me to update my Proxmox packages to the latest. Note the warning that the pve-no-subscription repository is not recommended for production use. However I find updates to be very stable in general.
You can always skip this step if you want ultimate stability.
deb http://ftp.debian.org/debian bullseye main contrib

deb http://ftp.debian.org/debian bullseye-updates main contrib

# PVE pve-no-subscription repository provided by proxmox.com,
# NOT recommended for production use
deb http://download.proxmox.com/debian/pve bullseye pve-no-subscription

# security updates
deb http://security.debian.org/debian-security bullseye-security main contrib
Run the following commands to update your repo databases, and also install some additional software:
apt update
apt install -y ifupdown2 openvswitch-switch
apt upgrade -y
You are now ready to modify your network configuration to switch to Open VSwitch (next page). Do a backup of your current network configuration, you may need to revert if you messed up your network configuration.
cp /etc/network/interfaces ~
Ideally you'll want to connect this Proxmox server to a keyboard and monitor just in case you need to revert the network configuration.
Reboot if prompted, and continue to the next step.
Complete Guide: Step 2 - Setup Proxmox Networking
Ideally you want to pass through the network card directory into your VM. Unfortunately I cannot do so because the PCI-e slot on my network card is in IOMMU group 1, and that group includes the Realtek controller. Direct passthrough of the network controller might also prevent Proxmox firewall from filtering the network traffic.
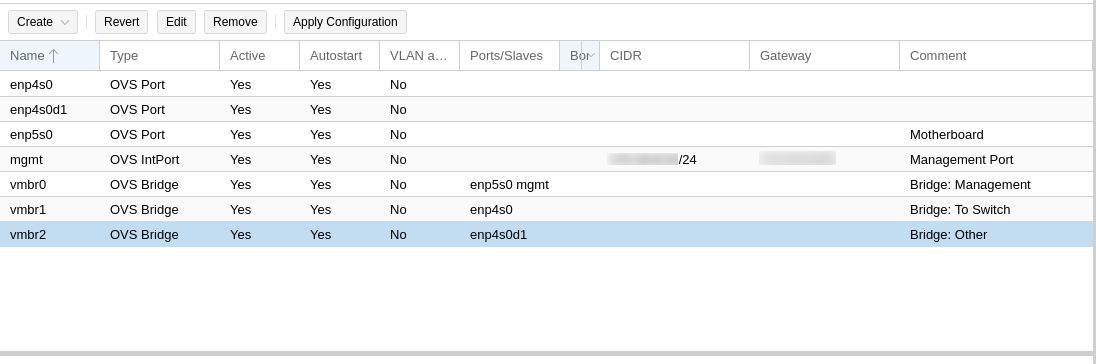
This is how I expose the two 10Gbps network connections into the TrueNAS VM. I am going to use Open VSwitch, and the VM is going to have 3 network interfaces. Note ports 2 and 3 are entirely optional, you can do everything from a single network card. As you would have guessed my home network has multiple networks (one network for management only, for IoT, for music streaming, for general use, and so on). Adjust your configuration as needed.
- enp5s0 (On board Ethernet). This should already be setup to point to your Proxmox IP. In my setup this network connection is going to be dedicated for management duties. i.e. The management IP of both Proxmox and TrueNAS administration portals will be via this dedicated network connection. This will be connected to the switch but only one network (or subnet) will be served.
- enp4s0 (Chelsio network, port #0). Passing this into TrueNAS VM. This is a dedicated 10 Gbps port connecting to my other Proxmox node. This is a direct connection to another computer and that is the only two machines on it's own isolated network.
- enp4s0d1 (Chelsio network, port #1). Passing this into TrueNAS VM. This is a dedicated 10 Gbps port dedicated to file sharing. This port will be connected to the switch but it will be served multiple subnets (Tagged VLANs).
Follow my examples and adapt accordingly, you can always revert to the original Linux bridge setup if you make a mistake by running this command:
cp ~/interfaces /etc/network/interfaces && ifreload -a
Open VSwitch Configuration
It is very important to NOT apply your network settings until the very last step. Applying your network configuration too early may cut your link to your Proxmox host.
First, delete all existing Linux bridges (You should have vmbr0).
Re-create vmbr0 as an OVS Bridge and link it to your onboard Ethernet (enp5s0 in my example):
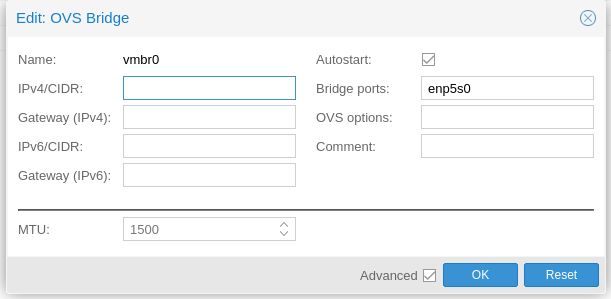
Create a OVS IntPort and link it to vmbr0, assign a static IP to your Proxmox host. This will be the IP of your Proxmox management interface (the very WebGUI you're currently on).

At this stage you may want to apply your network configuration and make sure you didn't break anything. The ifupdown2 package you've installed previously should simply apply all these changes without a reboot.
If everything works you can still access the admin panel on the network. Revert your old network configuration if you can't.
Next you want to setup your additional network ports for your NAS. One Open VSwitch bridge per additional network port:
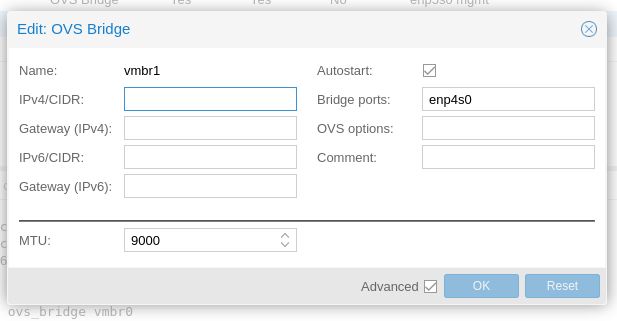
This bridge will not have any IP address as Proxmox does not need any IP address for this network. If you need an IP address for this, create a OVSInt port, assign it to this new bridge and give it an IP address.
Note I prefer to use Jumbo frames so the MTU for the bridge and it's OVS Ports are all set to 9000 (you can also try 9216). Do not change MTU if you have not enable Jumbo Frames on your switches/router.
If you are using Gigabit network ports it may be ideal to bond them into a single interface and present them to TrueNAS as one (and let Proxmox and your switch handle the physical layer), like so.
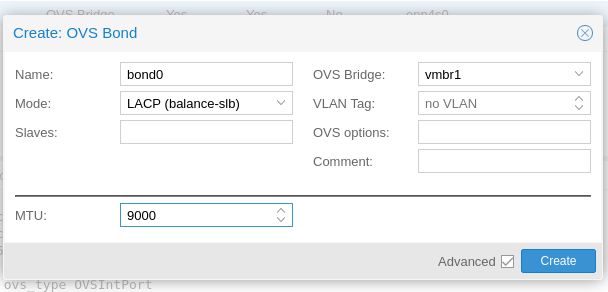
Enter all the OVS ports you want for the bond, and adjust your switch configuration to match. Repeat this step until you configured all your network ports. here is my example setup:
You can read the Proxmox Networking configuration page if you need more advance features.
You're now ready to setup your TrueNAS VM, go to the next step.
Complete Guide: Step 3 - Install TrueNAS
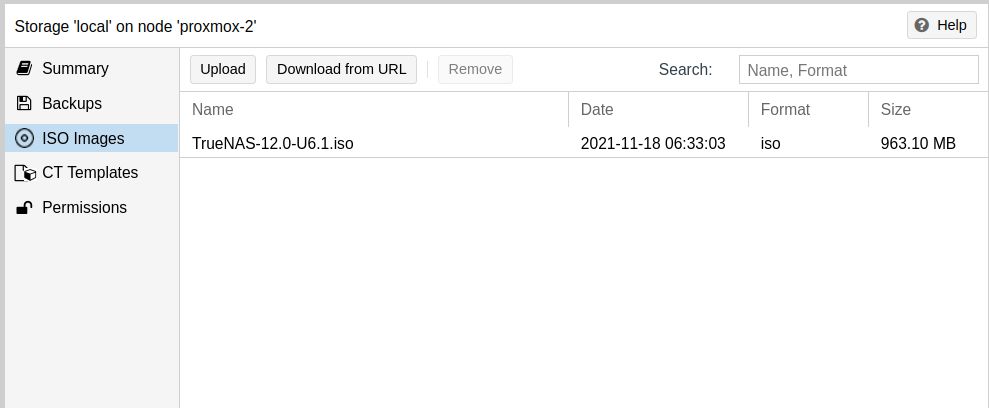
Download the latest TrueNAS ISO and upload it to your local storage. I couldn't get "Download From UR"L button to work. You should get something like this:
Create the VM (Click on the blue "Create VM" button on the top right). Choose a unique ID and name. I have set following advance options.
- Do not turn on "AutoStart" for now just in case you made a mistake with IOMMU group (e.g. you risk losing your Proxmox VE if the IOMMU Group you pass through includes your NVMe drive). You can always turn on AutoStart later when you verify everything is working
- This VM will startup immediately when on autostart
- This VM will shutdown after 60 seconds if I powerdown or reboot the server. This delay is to allow enough time for any VM, LXC or TrueNAS Jails to close gracefully before the NAS itself is powered down. Note if you are using a UPS the time here must not exceed your UPS battery up time.
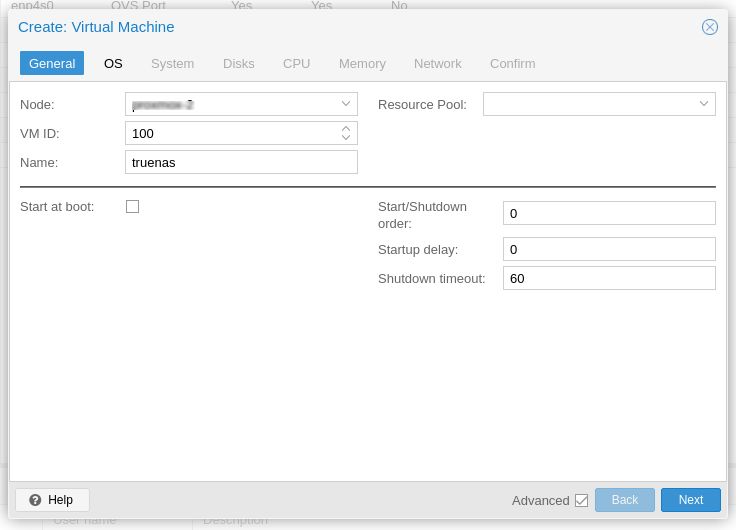
Click "Next".
Select the TrueNAS ISO, and "Other" as the OS.
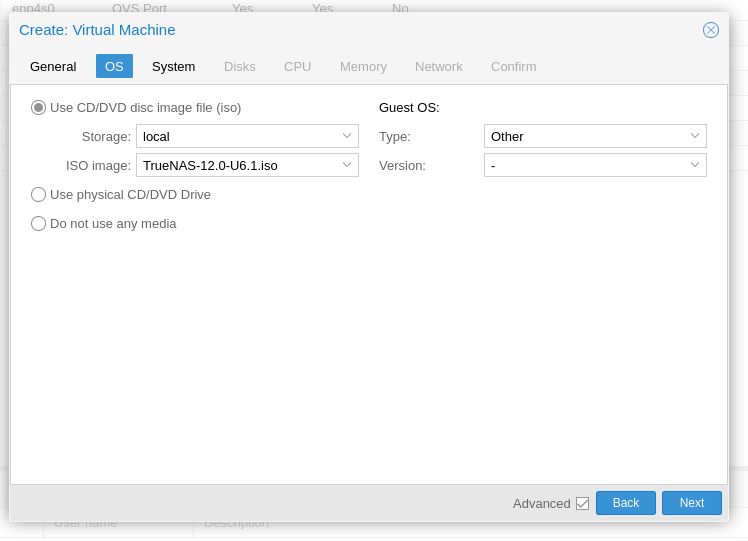
Click "Next".
Set the hardware to qx35, and check qemu agent.

Click "Next".
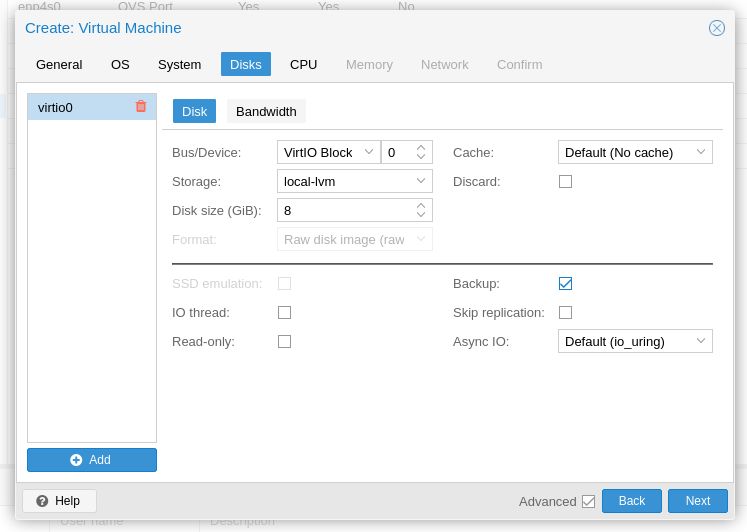
Create a virtual disk to house your TrueNAS OS. Create additional virtual drives for L2ARC and ZIL I prefer 1 virtual disk per zpool but you can technically use a single one for all your pools. I set all virtual disks to 20 GB and place them all on LVM-thin storage. All these virtual disks will be on my NVMe for the best bandwidths.
Obviously there are many strategies you can do here - from different sizes, pass a physical NVMe into the VM for ultimate speed and so on. I just prefer to have Proxmox host control my OS, logs and cache drives because I can then back them all up in a single hit.
Click "Next".
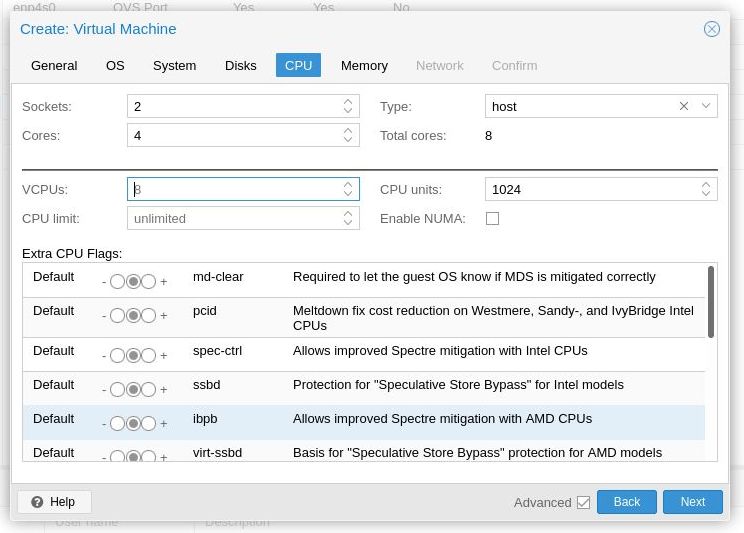
Set the CPU type to HOST. This means I can run virtualisation inside a virtualisation, allowing my jails to function better (yet to try this). Otherwise known as nested virtualisation. You can experiment with other vCPU types to suit. Note if you are using encrypted volumes you'll need a vCPU that has the necessary CPU instruction set for hardware encryption acceleration. I have no idea what those are so I just pass the whole CPU into my VM.
As AMD 5600G has 6 CPUs and 12 threads, so I am giving my TrueNAS VM a total of 8 vCPUs.
Click "Next".
ZFS is pretty CPU intensive, I am dedicated 48GB to TrueNAS VM since I have a 64 GB host. Make sure the Ballooning Device checkbox is off as you really want to dedicate a big chuck of your RAM to this VM. Remember the minimum requirements for TrueNAS is 8 GB, try not to use any number lower than 8192.
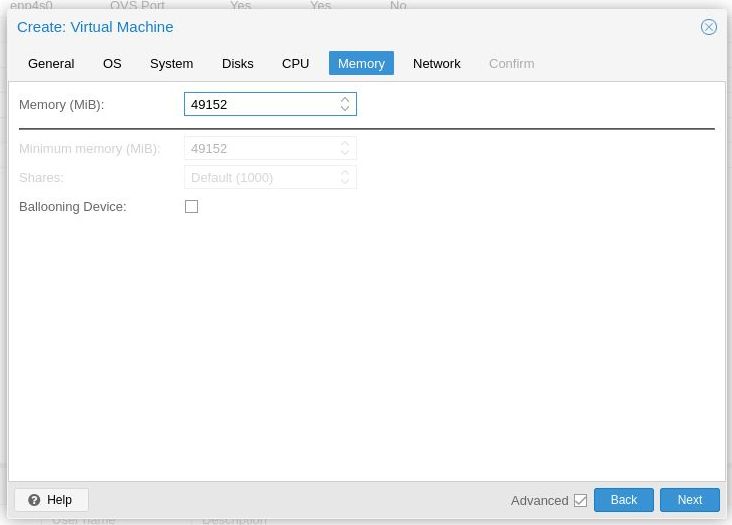
Click "next".
Connect vmbr0 for now. Ensure firewall is checked if you intend to use Proxmox firewall infrastructure to protect your NAS connections. Proxmox firewall will be discussed later.
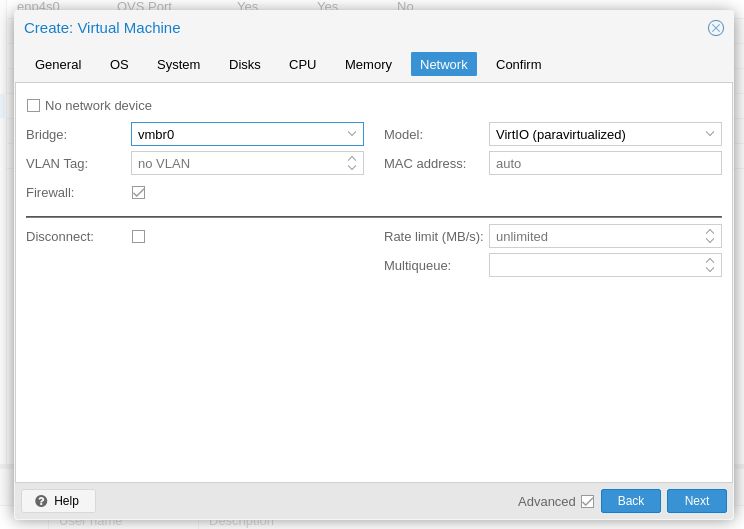
Click on to finish the VM creation and wait.
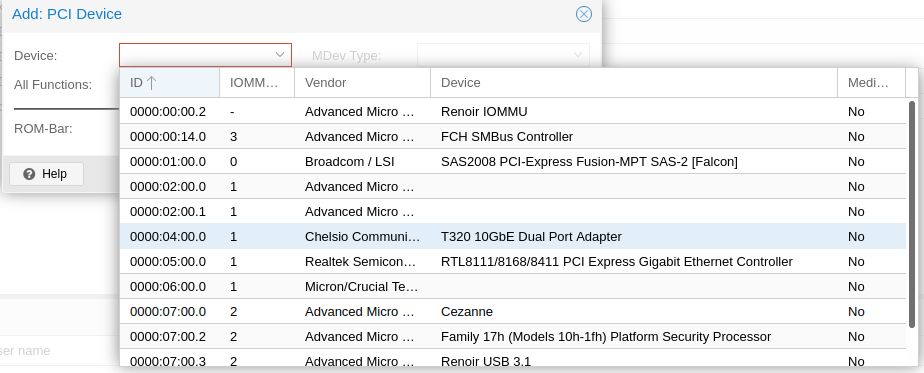
Once the VM is created, click on your VM, go into the Hardware option and create your PCI passthrough device if you are using a dedicated HBA controller. Check PCI-e checkbox since we are using qm35 machine type, and also uncheck ROM-bar.

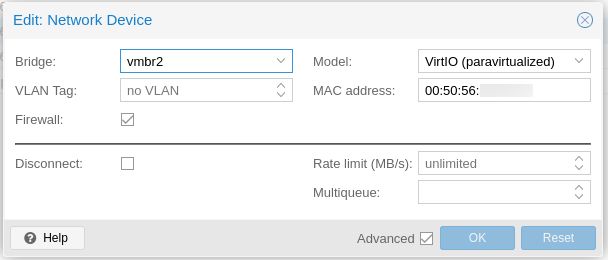
Also add any additional network bridges for the VM. Like the first network, the model used should be "VirtIO (paravirtualized)", and again check firewall if you intend to use firewall.
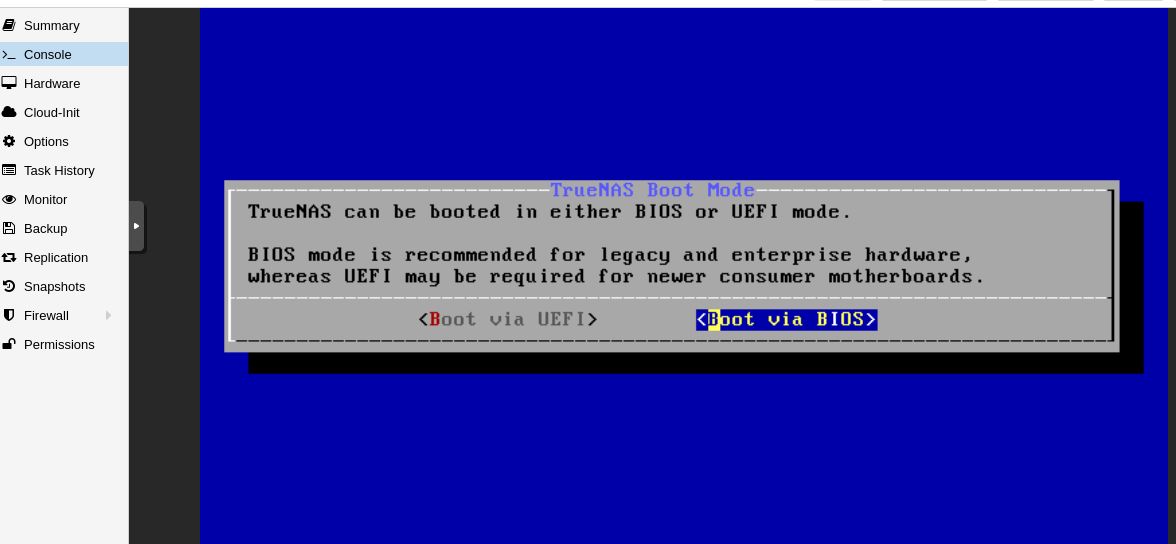
Now you are ready to boot up your VM to install TrueNAS. Follow this guide to install TrueNAS core. Only thing you need to make sure is to use BIOS as your bootloader. Proxmox does have a UEFI BIOS (OVMF) but I have not tested that.
You will be prompted to reboot after installation is finished. Click on reboot and disconnect the ISO image in the Hardware section.
The first boot will take some time, but eventually you'll see this, and you'll get a IP address on the network that's bridged to vmbr0 (provided a DHCP is running on the subnet).
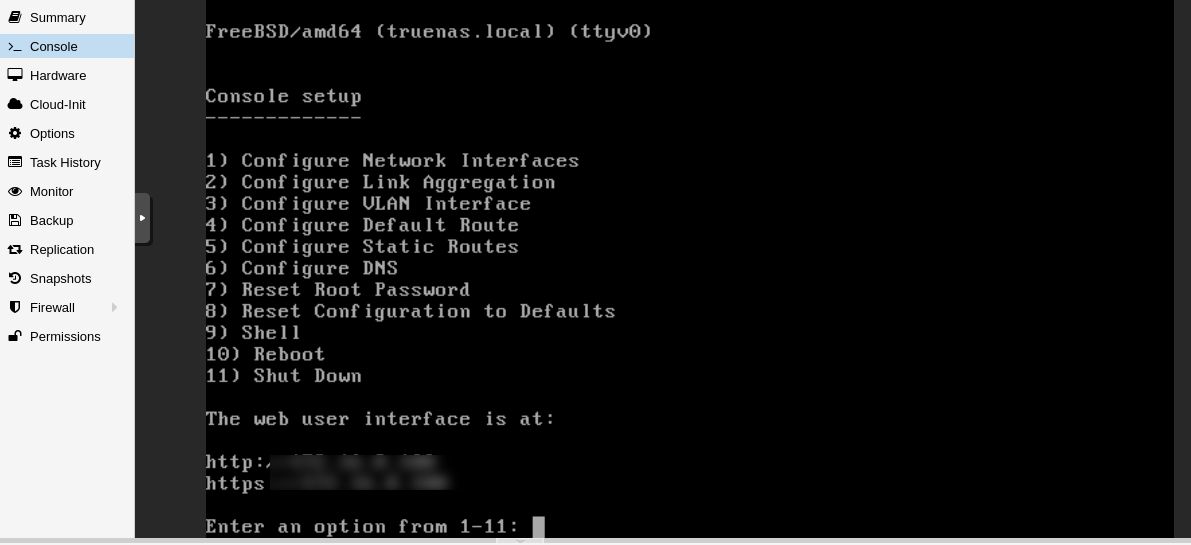
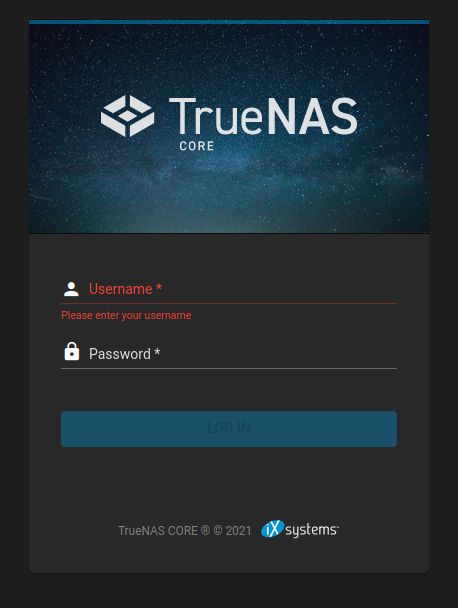
You should also get a portal login if your load a browser from another computer, and browse to the IP shown above.
If you don't, uncheck firewall checkbox in all your virtual network interfaces and try again.
Congrats! You have successfully virtualised TrueNAS inside Proxmox. You're almost there. Do not fret if you have problems, as I did simplified some of the steps above (this is a complete guide, not a step-by-step). Add a comment below or post in the problems if you need help.
Complete Guide: Step 4 - Install qemu guest agent
Follow this guide to install qemu guest agent for your TrueNAS VM. This is good to have as running the guest agent exposes certain functionalities to the Proxmox hypervisor.
If interested you can build the agent yourself here.Here is a list of all the features in the FreeBSD port. Unfortunately snapshot backups may be a problem as the FreeBSD port do not do suspend and fsfreeze functionalities. Do not rely on automated Proxmox backups, do a manual regular backups with the VM powered off once in a while just in case.
You will be doing the same with a regular TrueNAS machine anyway so this is no different. In fact backing up the entire OS is now easier in Proxmox, and is one of the reasons why I decided to use Proxmox hypervisor on top of TrueNAS core.
You can read more about qemu guest agent here.
Complete Guide: Step 5 - Setup TrueNAS Networking
Follow this guide to install your network interfaces. I am just going to cover the high level network topology here.
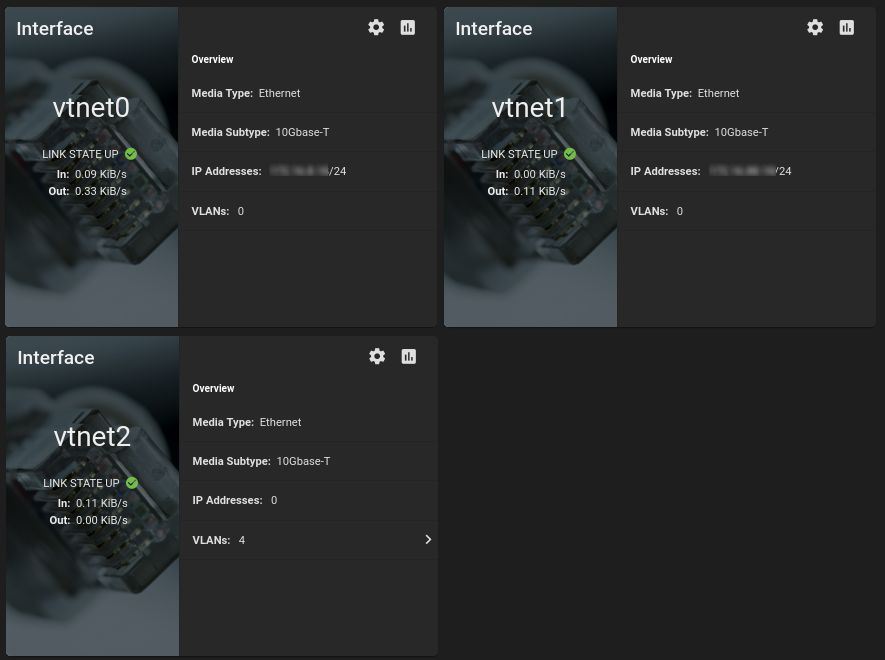
In my setup, vnet0 is the management interface. This is a dedicated network not accessible from the other networks. vnet1 is a dedicated link to a second server in my rack, while vnet2 (with the VLANs) serve data to all my 4 networks (I don't serve network files over the management network).
With a typical NAS setup, we either:
- Expose the network share from a single IP, and open up firewall rules to allow computers from other subnets to access the network share. This is known as Layer 3 (L3). While this provides better security you are at the mercy of your router (the device responsible for inter-network communications, AKA routing). Forwarding data between two different subnets can consume a fair amount of CPU. I am using a software router (Unifi UDM-Pro) where CPU cycles are consumed when performing inter-vlan routing. More CPU cycles are needed if you intend to firewall your inter-vlan traffic.
At time of writing most consumer routers you can get in the market today are software routers. Hardware routers are still pretty expensive. - Expose different network IP on all the networks you want to serve files on. This is known as Layer 2 (L2) and it means a slightly faster transfer speeds because your packets typically goes straight from point to point if both computers are connected to the same switch, and without changing the packet header. While this provides better speed there is a big risk with security, as your NAS IP is open to any machines on the subnet.
Previously there is no other way to easily mix the best of both worlds - until you virtualise TrueNAS inside Proxmox. This gives you a hybrid L2/L3 setup where all your clients connect to your NAS on Layer 2 (i.e. same subnet), and Proxmox firewall provides the layer 3 network protection. This is a fairly good compromise.
Yes you can use a powerful Intel i7 or a AMD flagship CPU as your software firewall (using something like pfSense or Untangle). However there is still something that cannot be easily overcome - jumbo frames!
Using a hybrid L2/L3 Proxmox/TrueNAS solution means it's less complex to mix Jumbo frame subnets with others. Your router do not have to worry about fragmenting the packets as it does inter-vlan routing. You do not need to worry about DF bit in your packets.
Everything is simplified with the hybrid setup, you put all the devices you want to communicate with Jumbo frames on it's own network, and it will inter-communicate with jumbo frames on L2. Internet traffic will still behave as normal.
Firewall management with Proxmox is also a lot simpler to administer, as compared to UDM-Pro's horrible firewall configuration. I have used Untangle and pfSense before moving to UDM-Pro. The two software routers are far superior to UDM-Pro, unfortunately my OCD simply refuse to accept the crippled firewall-less Unifi network controller.
Right now I have managed to find a solution I am happy with.
Complete Guide: Step 6 - Setup Storage Pool
This guide will not detail the steps on how to create a storage pool. Follow the linked instructions on how to create your zpool(s).
The reason for adding this page is to ensure you have a storage pool ready, because you'll be adding ZIL and L2ARC components to your storage pools.
Complete Guide: Step 7 - Setup L2ARC (ZCache) and ZIL (Log)
Next we need to add ZCache and Logs to your pools. Simplistically, these becomes your read/write buffer to your zpool and will improve the performance (and may prevent data loss from a sudden power cut). The virtual disks you create should reside on the NVMe storage. I'm using a 16G drive for each pool, of which 2G will be used for logs, and the remaining 16GB for cache.
First, go to the NAS UI, under Storage -> Disks, identify the drives for caching. These drives should be easily identifiable because they have no serial numbers. In my exmaple it will be da4. Change the following commandlines accordingly to match.
SSH to your NAS, or you can get a browser shell if you log in to the NAS WebApp (>_ Shell).
The disk will have no partition information, so the first thing to do is to run this:
gpart create -s gpt da4
Next we create the ZIL partition. I'm using 2G in my setup, you can choose a smaller value if you like.
gpart add -a 4k -b 128 -t freebsd-zfs -s 2G da4
Next create a partition and use all remaining space. This will be your ZCache.
gpart add -a 4k -b 128 -t freebsd-zfs da4
Now find the UUIDs
gpart list da4
Look for the fields rawuuid. Now add them to your pool. My pool is called 'data', replace the name with your zpool name:
zpool add data cache gptid/[rawuuid_of_cache]

zpool add data log gptid/[rawuuid_of_zil]
Once complete, run this command to verify everything is correct:
zpool status
You can monitor your zpool IO with this command:
zpool iostat -v
Complete Guide: Step 8 - Setup Proxmox Firewall
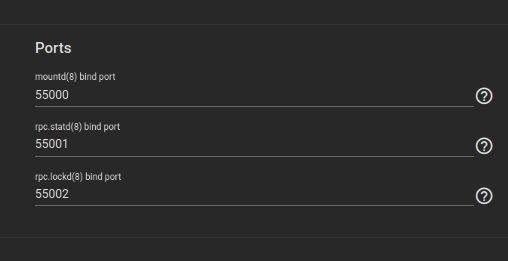
First up, in TrueNAS, go to Services -> NFS, change the ports to the following. This is for my setup, you can change these ports to any unused port you like.
Now you're ready to configure your Proxmox firewalls.
Before you start, it's a good idea to establish a SSH connection to your Proxmox node first before turning on the Proxmox firewall. Incorrect firewall settings can lock you out from Proxmox management and it's VMs. The pre-established SSH connection allows you disable the firewall and attempt to fix it.
Refer to the Proxmox Firewall documentation to get a general understanding on how Proxmox firewall works.
We will setup the rules first. First thing is to lock down your NAS VM. In Proxmox UI, go to your NAS VM. Under the VM's Firewall -> IPSet, create the following groups. These will be your clients, i.e. which computer can access which services.
- admin. This group contains the set of IP addresses/networks you want access to the NAS WebApp
- cifs. This is the set of IP addresses/networks that is allowed to use Windows Share.
- nfs. This is the set of IP addresses/networks that is allowed to use NFS.
You can create more groups if needed (e.g. Apple File Share, iSCSI, and so on). AFS is slowly being replaced by CIFS, and performance of iSCSI is slower when compared to NFS on my setup. These 3 groups should suit 99.9% in general.
For each group, you then add the IP addresses or networks, like so. E.g. Add your main computer network IP (or it's subnet) to all 3 groups. Like so: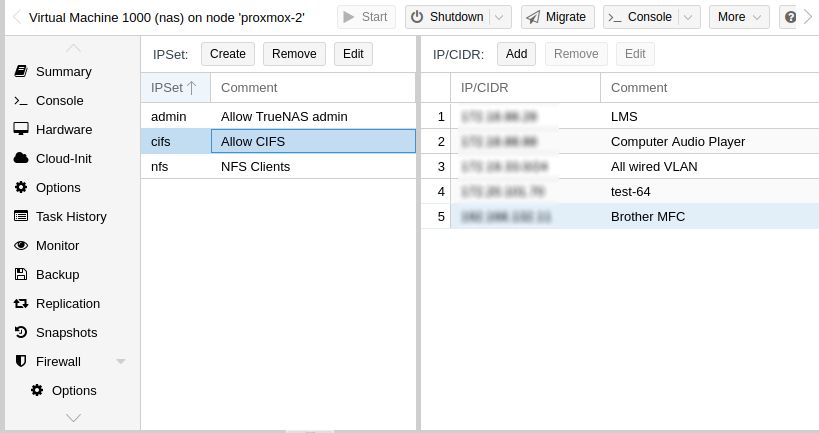
IP addresses and subnets are heavily used in Proxmox, so it is a good idea to assign a IP to all your important clients via DHCP where possible.
Here are the firewall rules for the NAS VM. Note the ports 55000 to 55002 are pre-defined in TrueNAS earlier. 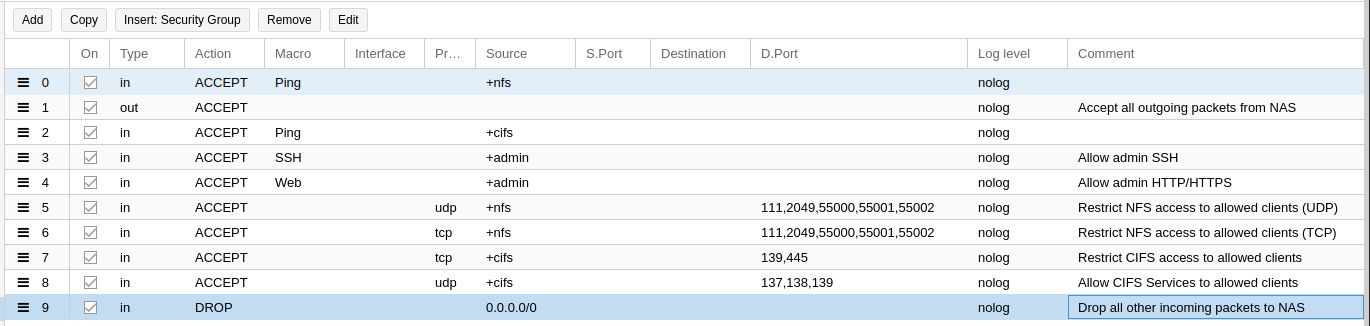
Rule 1 and 9 are default policies (Drop all incoming, and accept all outgoing). These rules although already configured correctly under Proxmox Firewall options do not always apply correctly for some reason. Adding these two rules explicity will work around this problem. A future version of Proxmox may fix this, but I wouldn't count on it.
Next, you'll want to lock down your Proxmox management UI, and only allow certain IPs to access them. Go to Datacenter -> Firewall -> IP Set, and create two groups:
- allowedhosts. This are the clients who are allowed to access Proxmox Management. Access to this is different from access to NAS. Add your workstation IP (or subnet) into this group.
- proxmox. This should only contain the IP address of your Proxmox server. It's a good idea to set your Proxmox in a IPSet now in case you want to expand your single Proxmox node into a multiple-node cluster.
With these two groups added you can proceed to add your datacenter firewall rule.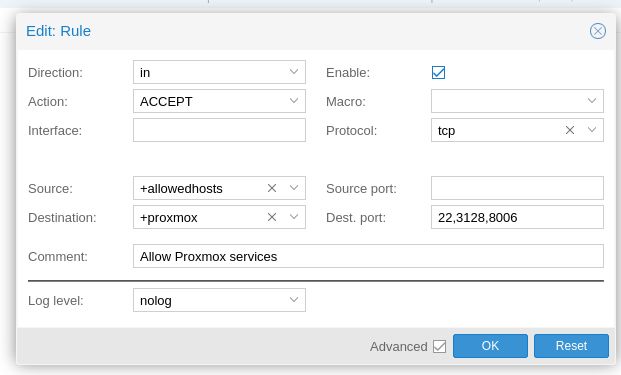
If you have plans to expand to a Proxmox cluster, you can add the following two rules. Just add all your Proxmox IPs to the proxmox IP Set and everything will be good.![]()
Now you're ready to turn on the Proxmox firewall. You'll need to enable Firewall from the top level down.
- Under Datacenter -> Firewall -> Options. Firewall needs to be checked (enabled). Leave everything else as the default.
- Under Node (Server) -> Firewall -> Options. Firewall needs to be checked (enabled). Leave everything else as the default.
- Under Node -> NAS Virtual Machine -> Firewall -> Options. Firewall needs to be checked (enabled). Leave everything else as the default.
-
Under Node -> NAS Virtual Machine -> Hardware. Check all the network interfaces you want to enable Firewall. Leave everything else as the default.
All four firewalls needs to be turned on, else nothing will work. Verify your firewall settings are set correctly:
- Only IPs/subnets set in the Datacenter IPset "allowedhost" is allowed to go to your Proxmox management UI
- Only IPs/subnets set in the NAS IPSet "admin" is allowed to go to the TrueNAS management UI
- Only IPs/subnets set in the "cifs" or "nfs" is allowed to access the shares (assuming this is also configured correctly in NFS).
If everything works, congrats, you now have a functioning L2/L3 hybrid firewall NAS. If there are problems, go to your pre-established SSH session, run the following command to disable proxmox firewall.
pve-firewall stop
Go through the rules and see what is wrong, and re-enable the firewall to test
pve-firewall start
Adding a firewall on top may appear to be counter-intuitive. However, in about 2 months of testing I have not noticed any performance loss. This is because the bottlebeck I have is the 1 Gbps network infrastructure. The backbone is 10 Gbps but it is still 1 Gbps connection to my IoT devices and work computers. As such this arrangement works really work.
If you want added security, you can also chose to install Suricata on top of Proxmox and configure the NAS traffic to be sent to suricata for inspection. I skipped this step because I already have a router doing this.
Complete Guide: Step 9 - Extras
Here are some additional things you can do to your TrueNAS VM.
Let Encrypt Certificates
TrueNAS Core 12.0 only supports AWS SSL certificates. If you have a registered domain from other providers (e.g. Cloudflare) you may want to add this script to automatically generate LetsEncrypt SSL certificates. This may change in 13.0, but again I wouldn't hold my breath.
Jails Or LXC
This is the million dollar question. Whether to run a BSD jail inside the VM, or run your applications outside the VM, but inside Proxmox as Linux containers (LXC). I have decided to go with the latter because doing so allows me more control (and easier backups).
Conclusion
There you have it. running TrueNAS CORE inside Proxmox. It looks overly complicated, why do this when TrueNAS SCALE can do all that? The answer is simple - ECC. If you followed my lead and uses normal RAM, you would notice something quirky when you're looking at the TrueNAS CORE management UI.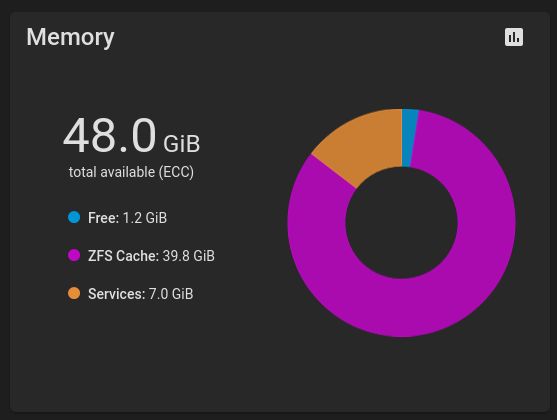
And it is Multi-bit ECC.
Handle 0x1000, DMI type 16, 23 bytes
Physical Memory Array
Location: Other
Use: System Memory
Error Correction Type: Multi-bit ECC
Maximum Capacity: 48 GB
Error Information Handle: Not Provided
Number Of Devices: 3
For some reason, in QEMU/KVM virtual machines, the memory is ECC. And this is the reason for this NAS build. With normal RAM modules, I do not think TrueNAS scale will have ECC protection for my zpool.
It will be great if this is ECC done in software, it can also just be a bug in the QEMU/KVM subsystem. It is still early days as I have only run this NAS for close to 2 months now. Time will tell.
Related News

Bit Rot, And How Important Is This For Audiophiles
Usually I refrain from blogging computing technical stuffs on Snakeoil.
Comments
I was writing a similar…
I was writing a similar guide for the teens that come to the IT workshop in our charity for children association and I found your guide. You did fantastic work. This is very helpful. 🙏🙏🙏🙏
be careful in part 10 gpart…
be careful in part 10
gpart add -a 4k -b 128 -t freebsd-zfs da4must be
gpart add -a 4k -t freebsd-zfs da4if you re specify the -b option with same number you will overwrite the first partition
Ryzen 5650 Pro CPU since it…
Ryzen 5650 Pro CPU since it has ECC support and is an APU so no IPMI needed. AsRock Riptide X570 mobo since it supports ECC, lots of PCIE slots, and has excellent IOMMU grouping (and costs $120 new atm) NEMIX ECC ram DDR4 3200 4x32GB ~$350. 1 stick was bad and it only cost me time as warranty was fully honored. Note memtext x86 actually didnt detect it unless i tested 1 stick at a time though journalctl reported the bad stick accurately post mortem.
Add new comment